Learn Strapi 5 from Scratch for Modern Content Platforms
A practical beginner roadmap to learn Strapi 5 from scratch by building a real blog CMS with content types, components, schema thinking, REST APIs, custom routes, and frontend-ready content delivery.
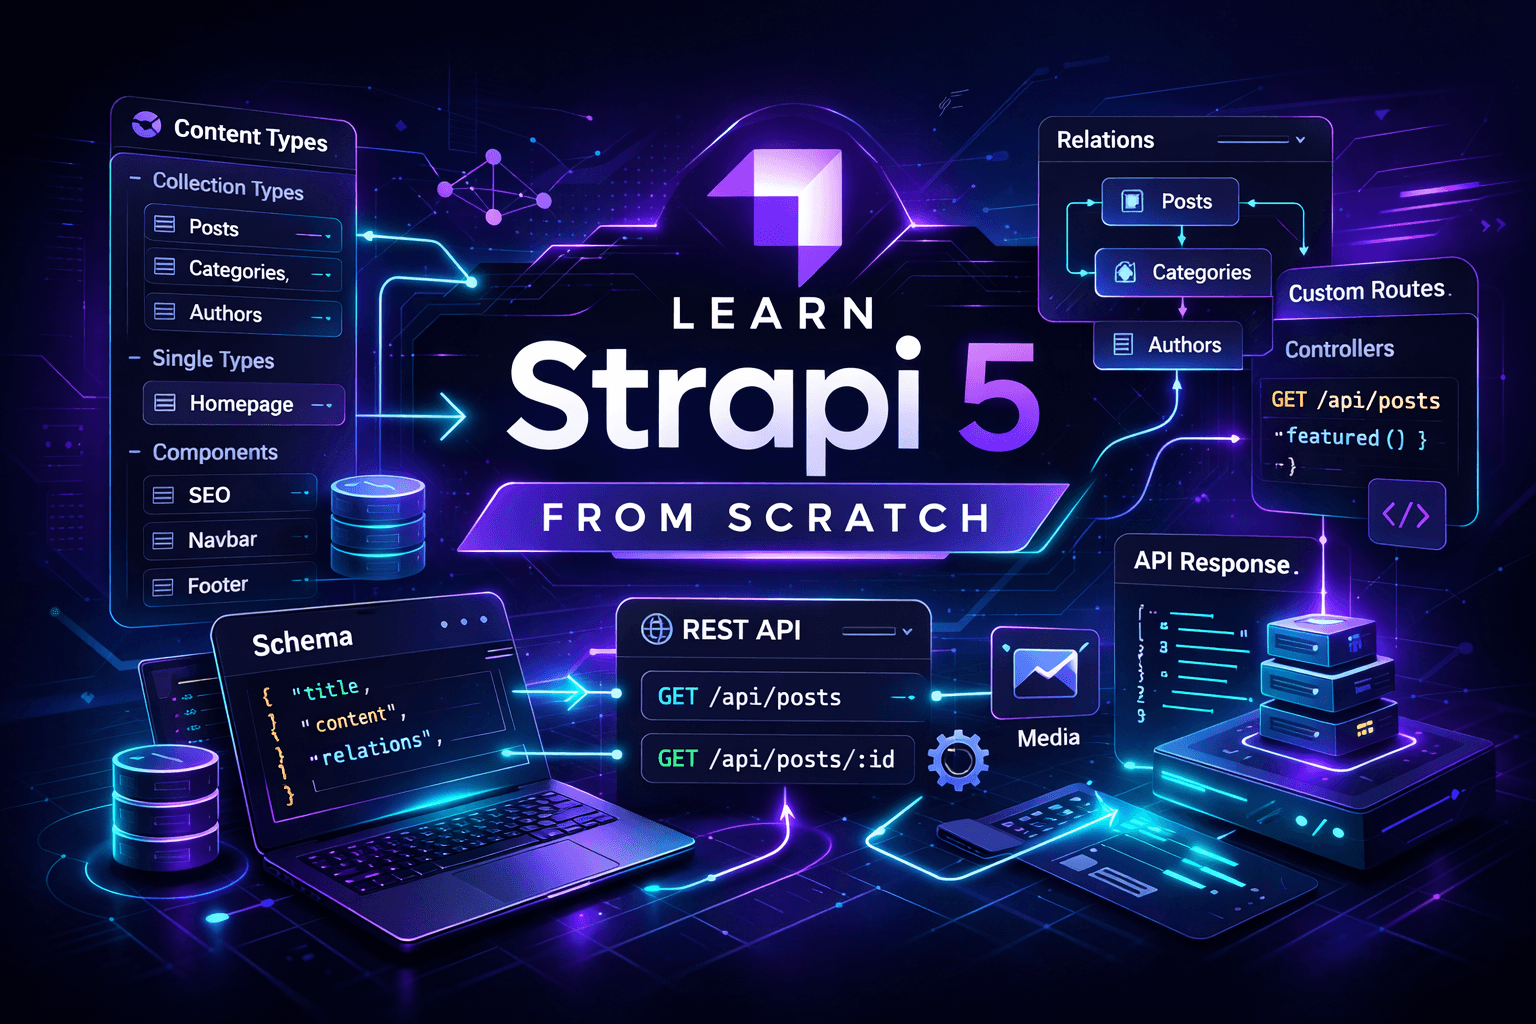
What the beginner will build
A simple blog CMS with:
- Authors
- Categories
- Posts
- A reusable SEO component
- Public REST API endpoints
- A custom
featured postsendpoint - A frontend-ready content structure
This is the right first project because it teaches the core Strapi mental model: model content, manage entries, expose APIs, then extend when needed. Strapi’s docs describe this exact pattern: define content-types with the Content-type Builder, manage entries through the admin, and access them through generated APIs. (Strapi Docs)
Stage 1 — Install Strapi 5 and run it locally
Start with the official project creation flow:
npx create-strapi@latest my-strapi-blog
cd my-strapi-blog
npm run develop
Then open:
http://localhost:1337/adminThe official quick start guide uses create-strapi@latest, then starts development with npm run develop. It also notes that the first run takes you into the admin setup flow. (Strapi Docs)
What the beginner should learn here
- What Strapi is
- What a headless CMS is
- Why Strapi is not the frontend
- What the admin panel is for
At this point, the beginner should understand one key truth: Strapi is the content engine, not the website itself. That mindset is the difference between learning cleanly and getting lost in the sauce.
Stage 2 — Learn the content model basics
Strapi’s Content-type Builder lets you create:
- Collection types for multiple entries
- Single types for one-off content
- Components for reusable structured fields
It is also only available in the development environment, which matters when teaching beginners how schema design works. (Strapi Docs)
Beginner mental model
Post→ collection typeAuthor→ collection typeCategory→ collection typeHomepage→ single typeSEO→ component
Why this matters
A beginner should stop thinking in pages only and start thinking in structured content blocks. That shift is the whole game.
Stage 3 — Create the first real content model
Build these in the Strapi admin.
Collection Type: Author
Fields:
name→ Text, requiredemail→ Emailbio→ Rich textavatar→ Media, single image
Collection Type: Category
Fields:
name→ Text, requiredslug→ UID based onname
Component: SEO
Fields:
metaTitle→ TextmetaDescription→ TextogImage→ Media, single image
Collection Type: Post
Fields:
title→ Text, requiredslug→ UID based ontitleexcerpt→ Textcontent→ Blocks / rich contentcover→ Mediafeatured→ Booleanauthor→ Relation, many posts to one authorcategories→ Relation, many posts to many categoriesseo→ Component, singleSEO
The official builder docs confirm support for collection types, components, field configuration, relations, and advanced options such as Draft & Publish. They also note that a content-type is only truly created once it is saved and has at least one valid field. (Strapi Docs)
What the beginner learns here
- How content-types differ from components
- Why relations matter
- Why UID fields are perfect for slugs
- How reusable SEO structures save pain later
Stage 4 — Show the beginner what the schema looks like
Even if the beginner builds through the UI first, they should still see the file-level structure. That removes the magic trick feeling.
Example src/api/post/content-types/post/schema.json
{
  "kind": "collectionType",
  "collectionName": "posts",
  "info": {
    "singularName": "post",
    "pluralName": "posts",
    "displayName": "Post"
  },
  "options": {
    "draftAndPublish": true
  },
  "attributes": {
    "title": {
      "type": "string",
      "required": true
    },
    "slug": {
      "type": "uid",
      "targetField": "title",
      "required": true
    },
    "excerpt": {
      "type": "text"
    },
    "content": {
      "type": "blocks"
    },
    "cover": {
      "type": "media",
      "multiple": false,
      "allowedTypes": ["images"]
    },
    "featured": {
      "type": "boolean",
      "default": false
    },
    "author": {
      "type": "relation",
      "relation": "manyToOne",
      "target": "api::author.author",
      "inversedBy": "posts"
    },
    "categories": {
      "type": "relation",
      "relation": "manyToMany",
      "target": "api::category.category"
    },
    "seo": {
      "type": "component",
      "repeatable": false,
      "component": "shared.seo"
    }
  }
}
Example src/components/shared/seo.json
{
  "collectionName": "components_shared_seos",
  "info": {
    "displayName": "SEO"
  },
  "attributes": {
    "metaTitle": {
      "type": "string"
    },
    "metaDescription": {
      "type": "text"
    },
    "ogImage": {
      "type": "media",
      "multiple": false,
      "allowedTypes": ["images"]
    }
  }
}
The builder docs explicitly describe content-types, fields, relations, components, and advanced settings like Draft & Publish, which is why showing the generated schema shape is a strong teaching move. (Strapi Docs)
Beginner takeaway
kind: collectionTypemeans many entriesuidis great for slugsrelationconnects contentcomponentmakes structures reusabledraftAndPublishenables editorial workflow
Stage 5 — Add real content through Content Manager
Now create actual entries:
- 1 author
- 2 categories
- 3 posts
- mark 1 post as
featured
The quick start guide follows this same rhythm: create structure first, then create content entries. (Strapi Docs)
What the beginner learns
- How to save drafts
- How publishing works
- How relations appear in actual entries
- Why clean sample data matters for testing APIs
A CMS without data is just a fancy skeleton wearing a blazer.
Stage 6 — Learn the REST API
Strapi auto-generates REST endpoints for content-types. The REST API docs also note that relations, media, components, and dynamic zones are not returned by default unless you use populate. (Strapi Docs)
First, enable public permissions
In the admin:
- Settings
- Users & Permissions
- Roles
- Public
- Enable
findandfindOneforpost,author, andcategory
Test the endpoints
Get all posts
curl http://localhost:1337/api/postsGet posts with everything populated
curl "http://localhost:1337/api/posts?populate=*"Get one post by slug
curl "http://localhost:1337/api/posts?filters[slug][$eq]=my-first-post&populate=*"What the beginner learns here
- Base endpoint pattern
populate=*- Filters
- Public permissions
- Why APIs are private until you open them intentionally
That last one matters. Production is not a playground.
Stage 7 — Fetch Strapi data from JavaScript
A beginner should see Strapi from the frontend side early.
Fetch all posts
const STRAPI_URL = "http://localhost:1337";

async function getPosts() {
  const res = await fetch(`${STRAPI_URL}/api/posts?populate=*`);

  if (!res.ok) {
    throw new Error("Failed to fetch posts");
  }

  const data = await res.json();
  return data;
}

getPosts()
  .then((data) => console.log(data))
  .catch((error) => console.error(error));
Fetch a single post by slug
const STRAPI_URL = "http://localhost:1337";

async function getPostBySlug(slug) {
  const query = new URLSearchParams({
    "filters[slug][$eq]": slug,
    "populate[cover]": "*",
    "populate[author][populate]": "*",
    "populate[categories]": "*",
    "populate[seo][populate]": "*"
  });

  const res = await fetch(`${STRAPI_URL}/api/posts?${query.toString()}`);

  if (!res.ok) {
    throw new Error("Failed to fetch post");
  }

  return res.json();
}
The REST docs support this query-based style for filtering and population. (Strapi Docs)
What the beginner learns
- How a frontend consumes Strapi
- Why populate matters
- Why slugs are useful
- How to shape data for blog pages
Stage 8 — Show the project structure
The beginner needs to understand where things live.
my-strapi-blog/
├─ config/
├─ database/
├─ public/
├─ src/
│  ├─ api/
│  │  ├─ author/
│  │  │  ├─ content-types/
│  │  │  │  └─ author/
│  │  │  │     └─ schema.json
│  │  │  ├─ controllers/
│  │  │  ├─ routes/
│  │  │  └─ services/
│  │  ├─ category/
│  │  └─ post/
│  ├─ components/
│  │  └─ shared/
│  │     └─ seo.json
│  ├─ admin/
│  └─ extensions/
├─ package.json
└─ .env
The backend customization docs describe Strapi’s flow through routes, controllers, middlewares, and services, which is why this structure matters for teaching real backend thinking. (Strapi Docs)
Stage 9 — Create a custom endpoint
This is where the beginner stops treating Strapi like a magic content box and starts understanding it as a backend platform.
The official docs explain that routes map URLs to controllers and that controllers contain the logic executed for those routes. Strapi also auto-generates routes for content-types, but custom ones can be added. (Strapi Docs)
Goal
Create:
GET /api/posts/featuredRoute file
src/api/post/routes/custom-post.ts
export default {
  routes: [
    {
      method: "GET",
      path: "/posts/featured",
      handler: "post.featured",
      config: {
        auth: false
      }
    }
  ]
};
Controller file
src/api/post/controllers/post.ts
export default {
  async featured(ctx) {
    const entries = await strapi.documents("api::post.post").findMany({
      filters: {
        featured: {
          $eq: true
        }
      },
      populate: ["cover", "author", "categories", "seo"]
    });

    ctx.body = {
      data: entries
    };
  }
};
What the beginner learns
- What a route is
- What a controller is
- How to add custom backend logic
- Why not every feature should rely on default CRUD only
That is the first real backend flex.
Stage 10 — Teach the CRUD map
Strapi generates CRUD-style endpoints for content-types. The routes docs and backend docs confirm that these routes are auto-generated and can be extended. (Strapi Docs)
Mental CRUD map
GET /api/posts
GET /api/posts/:id
POST /api/posts
PUT /api/posts/:id
DELETE /api/posts/:id
Beginner lesson
Even if the UI creates a lot for you, there is still a real backend pattern underneath. That matters because the beginner is not just learning a tool, but a backend way of thinking.
Stage 11 — Connect to a real frontend
A good beginner project should end with frontend consumption.
Example rendering function
function renderPostCard(post) {
  return `
    <article>
      <h2>${post.title}</h2>
      <p>${post.excerpt ?? ""}</p>
      <a href="/blog/${post.slug}">Read more</a>
    </article>
  `;
}
Suggested beginner frontend routes
/blog→ list all posts/blog/[slug]→ post detail page
Beginner lesson
Strapi handles content and API delivery.
Your frontend handles presentation and user experience.
Keep those roles clean and life gets less cursed.
Stage 12 — Learn security basics
The REST API is not public by default. Permissions must be configured intentionally. The REST docs and general backend flow reinforce that route access and API exposure should be controlled. (Strapi Docs)
Teach this clearly
- Do not expose everything publicly
- Use
findandfindOneonly when appropriate - Keep drafts private
- Do not confuse admin access with public API access
This is a beginner lesson that saves future headaches.
Stage 13 — Learn deployment basics
The official deployment docs cover preparing Strapi for deployment and mention Strapi Cloud as one hosted option. They also note that Strapi’s data management system can help move structure and data between instances. (Strapi Docs)
Beginner deployment goals
- Understand
.env - Choose a production database
- Think about media storage
- Separate dev and production
- Learn that localhost is not a business plan
Recommended learning order
- Install Strapi 5
- Learn collection types, single types, and components
- Build
Author,Category,SEO, andPost - Add real content
- Open public API permissions safely
- Learn
populateand filtering - Consume data with JavaScript
- Add one custom route and controller
- Deploy the project
That order is clean. Starting with plugins or admin extensions on day one is just chaos in a suit.
Related Stacks

Next.js + Sanity
A flexible stack for content-rich websites that need strong editorial tooling, fast previews, and modern React-based frontend delivery.

Nuxt 4 + Strapi 5
A modern content-driven stack for SEO-friendly websites, blogs, documentation platforms, and scalable editorial projects.
SvelteKit + Tailwind CSS for Modern Landing Pages
A flexible landing page stack for developers and startups who want modern design, strong performance, and room to grow into a more interactive web experience.

Astro with Content Collections + Tailwind 4 + shadcn
A modern portfolio stack for developers, designers, and creators who want a fast personal website, polished project showcases, reusable UI components, and structured content without relying on a full CMS.

Astro + Tailwind CSS for Modern Landing Pages
A beginner-friendly stack for building fast, modern, and visually polished landing pages with strong performance and clean frontend architecture.